本文首发于我的公众号 「Linux云计算网络」(id: cloud_dev) ,专注于干货分享,号内有大量书籍和视频资源,后台回复「1024」即可领取,欢迎大家关注,二维码文末可以扫。

本文通过 IP 命令操作来简单介绍 network namespace 的基本概念和用法。

深入了解可以看看我之前写的两篇文章 Docker 基础技术之 Linux namespace 详解Docker 基础技术之 Linux namespace 源码分析

和 network namespace 相关的操作的子命令是 ip netns

文章首发于我的公众号「Linux云计算网络」,欢迎关注,第一时间掌握技术干货!

上篇我们从进程 clone 的角度,结合代码简单分析了 Linux 提供的 6 种 namespace,本篇从源码上进一步分析 Linux namespace,让你对 Docker namespace 的隔离机制有更深的认识。我用的是 Linux-4.1.19 的版本,由于 namespace 模块更新都比较少,所以,只要 3.0 以上的版本都是差不多的。

从内核进程描述符 task_struct 开始切入


由于 Linux namespace 是用来做进程资源隔离的,所以在进程描述符中,一定有 namespace 所对应的信息,我们可以从这里开始切入代码。

首先找到描述进程信息 task_struct,找到指向 namespace 的结构 struct *nsproxy(sched.h):

1
2
3
4
5
6
struct task_struct {
......
/* namespaces */
struct nsproxy *nsproxy;
......
}

其中 nsproxy 结构体定义在 nsproxy.h 中:

1
2
3
4
5
6
7
8
9
10
11
12
13
14
15
16
17
18
19
20
21
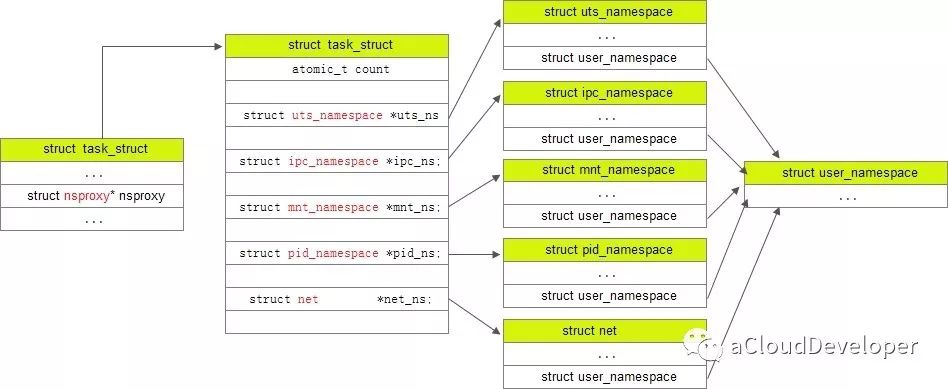
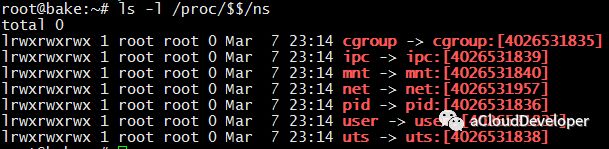
/*
* A structure to contain pointers to all per-process
* namespaces - fs (mount), uts, network, sysvipc, etc.
*
* 'count' is the number of tasks holding a reference.
* The count for each namespace, then, will be the number
* of nsproxies pointing to it, not the number of tasks.
*
* The nsproxy is shared by tasks which share all namespaces.
* As soon as a single namespace is cloned or unshared, the
* nsproxy is copied.
*/
struct nsproxy {
atomic_t count;
struct uts_namespace *uts_ns;
struct ipc_namespace *ipc_ns;
struct mnt_namespace *mnt_ns;
struct pid_namespace *pid_ns;
struct net *net_ns;
};
extern struct nsproxy init_nsproxy;

这个结构是被所有 namespace 所共享的,只要一个 namespace 被 clone 了,nsproxy 也会被 clone。注意到,由于 user namespace 是和其他 namespace 耦合在一起的,所以没出现在上述结构中。

同时,nsproxy.h 中还定义了一些对 namespace 的操作,包括 copy_namespaces 等。

1
2
3
4
5
6
int copy_namespaces(unsigned long flags, struct task_struct *tsk);
void exit_task_namespaces(struct task_struct *tsk);
void switch_task_namespaces(struct task_struct *tsk, struct nsproxy *new);
void free_nsproxy(struct nsproxy *ns);
int unshare_nsproxy_namespaces(unsigned long, struct nsproxy **,
struct fs_struct *);

task_struct,nsproxy,几种 namespace 之间的关系如下所示:

各个 namespace 的初始化


在各个 namespace 结构定义下都有个 init 函数,nsproxy 也有个 init_nsproxy 函数,init_nsproxy 在 task 初始化的时候会被初始化,附带的,init_nsproxy 中定义了各个 namespace 的 init 函数,如下:
在 init_task 函数中(init_task.h):

1
2
3
4
5
6
7
8
9
10
/*
* INIT_TASK is used to set up the first task table, touch at
* your own risk!. Base=0, limit=0x1fffff (=2MB)
*/
#define INIT_TASK(tsk) \
{
......
.nsproxy = &init_nsproxy,
......
}

继续跟进 init_nsproxy,在 nsproxy.c 中:

1
2
3
4
5
6
7
8
9
10
11
12
struct nsproxy init_nsproxy = {
.count = ATOMIC_INIT(1),
.uts_ns = &init_uts_ns,
#if defined(CONFIG_POSIX_MQUEUE) || defined(CONFIG_SYSVIPC)
.ipc_ns = &init_ipc_ns,
#endif
.mnt_ns = NULL,
.pid_ns_for_children = &init_pid_ns,
#ifdef CONFIG_NET
.net_ns = &init_net,
#endif
};

可见,init_nsproxy 中,对 uts, ipc, pid, net 都进行了初始化,但 mount 却没有。

创建新的 namespace


初始化完之后,下面看看如何创建一个新的 namespace,通过前面的文章,我们知道是通过 clone 函数来完成的,在 Linux kernel 中,fork/vfork() 对 clone 进行了封装,如下:

1
2
3
4
5
6
7
8
9
10
11
12
13
14
15
16
17
18
19
20
21
22
23
24
25
26
27
28
29
30
31
32
33
34
35
36
37
38
39
40
41
42
43
44
45
46
#ifdef __ARCH_WANT_SYS_FORK
SYSCALL_DEFINE0(fork)
{
#ifdef CONFIG_MMU
return do_fork(SIGCHLD, 0, 0, NULL, NULL);
#else
/* can not support in nommu mode */
return -EINVAL;
#endif
}
#endif

#ifdef __ARCH_WANT_SYS_VFORK
SYSCALL_DEFINE0(vfork)
{
return do_fork(CLONE_VFORK | CLONE_VM | SIGCHLD, 0, 0, NULL, NULL);
}
#endif

#ifdef __ARCH_WANT_SYS_CLONE
#ifdef CONFIG_CLONE_BACKWARDS
SYSCALL_DEFINE5(clone, unsigned long, clone_flags, unsigned long, newsp,
int __user *, parent_tidptr,
int, tls_val,
int __user *, child_tidptr)
#elif defined(CONFIG_CLONE_BACKWARDS2)
SYSCALL_DEFINE5(clone, unsigned long, newsp, unsigned long, clone_flags,
int __user *, parent_tidptr,
int __user *, child_tidptr,
int, tls_val)
#elif defined(CONFIG_CLONE_BACKWARDS3)
SYSCALL_DEFINE6(clone, unsigned long, clone_flags, unsigned long, newsp,
int, stack_size,
int __user *, parent_tidptr,
int __user *, child_tidptr,
int, tls_val)
#else
SYSCALL_DEFINE5(clone, unsigned long, clone_flags, unsigned long, newsp,
int __user *, parent_tidptr,
int __user *, child_tidptr,
int, tls_val)
#endif
{
return do_fork(clone_flags, newsp, 0, parent_tidptr, child_tidptr);
}
#endif

可以看到,无论是 fork() 还是 vfork(),最终都会调用到 do_fork() 函数:

1
2
3
4
5
6
7
8
9
10
11
12
13
14
15
16
17
18
19
20
21
22
23
24
25
26
27
28
29
30
31
32
33
34
35
36
37
38
39
40
41
42
43
44
45
46
47
48
49
50
51
52
53
54
55
56
57
58
59
60
61
62
63
64
65
66
67
68
69
70
71
72
73
74
75
76
77
78
79
80
81
82
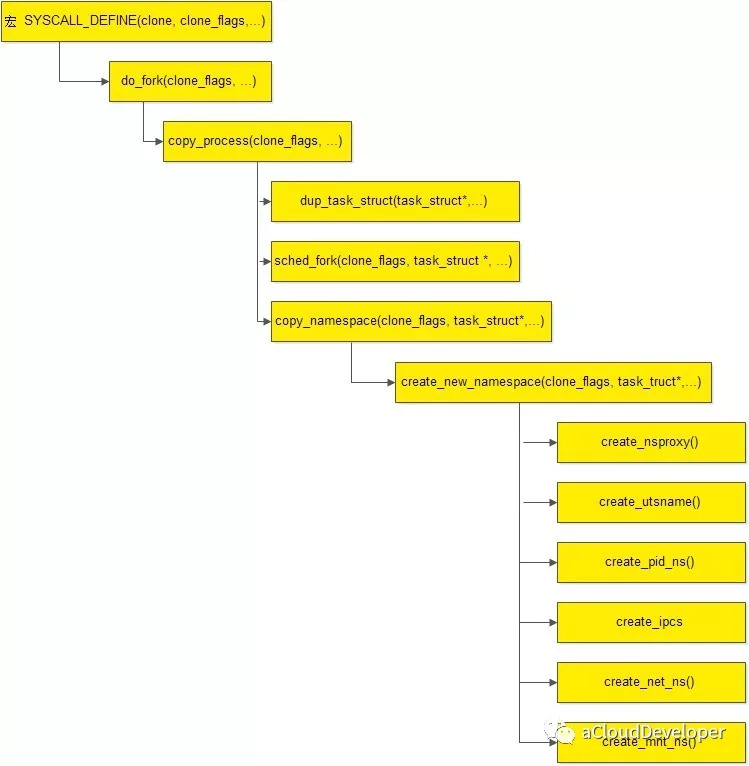
/*
* Ok, this is the main fork-routine.
*
* It copies the process, and if successful kick-starts
* it and waits for it to finish using the VM if required.
*/
long do_fork(unsigned long clone_flags,
unsigned long stack_start,
unsigned long stack_size,
int __user *parent_tidptr,
int __user *child_tidptr)
{
// 创建进程描述符指针
struct task_struct *p;
int trace = 0;
long nr;

/*
* Determine whether and which event to report to ptracer. When
* called from kernel_thread or CLONE_UNTRACED is explicitly
* requested, no event is reported; otherwise, report if the event
* for the type of forking is enabled.
*/
if (!(clone_flags & CLONE_UNTRACED)) {
if (clone_flags & CLONE_VFORK)
trace = PTRACE_EVENT_VFORK;
else if ((clone_flags & CSIGNAL) != SIGCHLD)
trace = PTRACE_EVENT_CLONE;
else
trace = PTRACE_EVENT_FORK;

if (likely(!ptrace_event_enabled(current, trace)))
trace = 0;
}

// 复制进程描述符,返回值是 task_struct
p = copy_process(clone_flags, stack_start, stack_size,
child_tidptr, NULL, trace);
/*
* Do this prior waking up the new thread - the thread pointer
* might get invalid after that point, if the thread exits quickly.
*/
if (!IS_ERR(p)) {
struct completion vfork;
struct pid *pid;

trace_sched_process_fork(current, p);

// 得到新进程描述符的 pid
pid = get_task_pid(p, PIDTYPE_PID);
nr = pid_vnr(pid);

if (clone_flags & CLONE_PARENT_SETTID)
put_user(nr, parent_tidptr);

// 调用 vfork() 方法,完成相关的初始化工作
if (clone_flags & CLONE_VFORK) {
p->vfork_done = &vfork;
init_completion(&vfork);
get_task_struct(p);
}

// 将新进程加入到调度器中,为其分配 CPU,准备执行
wake_up_new_task(p);

// fork() 完成,子进程开始运行,并让 ptrace 跟踪
/* forking complete and child started to run, tell ptracer */
if (unlikely(trace))
ptrace_event_pid(trace, pid);

// 如果是 vfork(),将父进程加入等待队列,等待子进程完成
if (clone_flags & CLONE_VFORK) {
if (!wait_for_vfork_done(p, &vfork))
ptrace_event_pid(PTRACE_EVENT_VFORK_DONE, pid);
}

put_pid(pid);
} else {
nr = PTR_ERR(p);
}
return nr;
}

do_fork() 首先调用 copy_process 将父进程信息复制给子进程,然后调用 vfork() 完成相关的初始化工作,接着调用 wake_up_new_task() 将进程加入调度器中,为之分配 CPU。最后,等待子进程退出。

copy_process():

1
2
3
4
5
6
7
8
9
10
11
12
13
14
15
16
17
18
19
20
21
22
23
24
25
26
27
28
29
30
31
32
33
34
35
36
37
38
39
40
41
42
43
44
45
46
47
48
49
50
51
52
53
54
55
56
57
58
59
60
61
62
63
64
65
66
67
68
69
70
71
72
73
74
75
76
77
78
79
80
81
82
83
84
85
86
87
88
89
90
91
92
93
94
95
96
97
98
99
100
101
102
103
104
105
106
107
108
109
110
111
112
113
114
115
116
117
118
119
120
121
122
123
124
125
126
127
128
129
130
131
132
133
134
135
136
137
138
139
140
141
142
143
144
145
146
147
148
149
150
151
152
153
154
155
156
157
158
159
160
161
162
163
164
165
166
167
168
169
static struct task_struct *copy_process(unsigned long clone_flags,
unsigned long stack_start,
unsigned long stack_size,
int __user *child_tidptr,
struct pid *pid,
int trace)
{
int retval;
// 创建进程描述符指针
struct task_struct *p;

// 检查 clone flags 的合法性,比如 CLONE_NEWNS 与 CLONE_FS 是互斥的
if ((clone_flags & (CLONE_NEWNS|CLONE_FS)) == (CLONE_NEWNS|CLONE_FS))
return ERR_PTR(-EINVAL);

if ((clone_flags & (CLONE_NEWUSER|CLONE_FS)) == (CLONE_NEWUSER|CLONE_FS))
return ERR_PTR(-EINVAL);

/*
* Thread groups must share signals as well, and detached threads
* can only be started up within the thread group.
*/
if ((clone_flags & CLONE_THREAD) && !(clone_flags & CLONE_SIGHAND))
return ERR_PTR(-EINVAL);

/*
* Shared signal handlers imply shared VM. By way of the above,
* thread groups also imply shared VM. Blocking this case allows
* for various simplifications in other code.
*/
if ((clone_flags & CLONE_SIGHAND) && !(clone_flags & CLONE_VM))
return ERR_PTR(-EINVAL);

/*
* Siblings of global init remain as zombies on exit since they are
* not reaped by their parent (swapper). To solve this and to avoid
* multi-rooted process trees, prevent global and container-inits
* from creating siblings.
*/
// 比如CLONE_PARENT时得检查当前signal flags是否为SIGNAL_UNKILLABLE,防止kill init进程。
if ((clone_flags & CLONE_PARENT) &&
current->signal->flags & SIGNAL_UNKILLABLE)
return ERR_PTR(-EINVAL);

/*
* If the new process will be in a different pid or user namespace
* do not allow it to share a thread group or signal handlers or
* parent with the forking task.
*/
if (clone_flags & CLONE_SIGHAND) {
if ((clone_flags & (CLONE_NEWUSER | CLONE_NEWPID)) ||
(task_active_pid_ns(current) !=
current->nsproxy->pid_ns_for_children))
return ERR_PTR(-EINVAL);
}

retval = security_task_create(clone_flags);
if (retval)
goto fork_out;

retval = -ENOMEM;
// 复制当前的 task_struct
p = dup_task_struct(current);
if (!p)
goto fork_out;

ftrace_graph_init_task(p);

rt_mutex_init_task(p);

#ifdef CONFIG_PROVE_LOCKING
DEBUG_LOCKS_WARN_ON(!p->hardirqs_enabled);
DEBUG_LOCKS_WARN_ON(!p->softirqs_enabled);
#endif
retval = -EAGAIN;

// 检查进程是否超过限制,由 OS 定义
if (atomic_read(&p->real_cred->user->processes) >=
task_rlimit(p, RLIMIT_NPROC)) {
if (p->real_cred->user != INIT_USER &&
!capable(CAP_SYS_RESOURCE) && !capable(CAP_SYS_ADMIN))
goto bad_fork_free;
}
current->flags &= ~PF_NPROC_EXCEEDED;

retval = copy_creds(p, clone_flags);
if (retval < 0)
goto bad_fork_free;

/*
* If multiple threads are within copy_process(), then this check
* triggers too late. This doesn't hurt, the check is only there
* to stop root fork bombs.
*/
retval = -EAGAIN;
// 检查进程数是否超过 max_threads,由内存大小定义
if (nr_threads >= max_threads)
goto bad_fork_cleanup_count;

// ......

// 初始化 io 计数器
task_io_accounting_init(&p->ioac);
acct_clear_integrals(p);

// 初始化 CPU 定时器
posix_cpu_timers_init(p);

// ......

// 初始化进程数据结构,并为进程分配 CPU,进程状态设置为 TASK_RUNNING
/* Perform scheduler related setup. Assign this task to a CPU. */
retval = sched_fork(clone_flags, p);

if (retval)
goto bad_fork_cleanup_policy;

retval = perf_event_init_task(p);
if (retval)
goto bad_fork_cleanup_policy;
retval = audit_alloc(p);
if (retval)
goto bad_fork_cleanup_perf;
/* copy all the process information */
// 复制所有进程信息,包括文件系统,信号处理函数、信号、内存管理等
shm_init_task(p);
retval = copy_semundo(clone_flags, p);
if (retval)
goto bad_fork_cleanup_audit;
retval = copy_files(clone_flags, p);
if (retval)
goto bad_fork_cleanup_semundo;
retval = copy_fs(clone_flags, p);
if (retval)
goto bad_fork_cleanup_files;
retval = copy_sighand(clone_flags, p);
if (retval)
goto bad_fork_cleanup_fs;
retval = copy_signal(clone_flags, p);
if (retval)
goto bad_fork_cleanup_sighand;
retval = copy_mm(clone_flags, p);
if (retval)
goto bad_fork_cleanup_signal;
// !!! 复制 namespace
retval = copy_namespaces(clone_flags, p);
if (retval)
goto bad_fork_cleanup_mm;
retval = copy_io(clone_flags, p);
if (retval)
goto bad_fork_cleanup_namespaces;
// 初始化子进程内核栈
retval = copy_thread(clone_flags, stack_start, stack_size, p);
if (retval)
goto bad_fork_cleanup_io;
// 为新进程分配新的 pid
if (pid != &init_struct_pid) {
pid = alloc_pid(p->nsproxy->pid_ns_for_children);
if (IS_ERR(pid)) {
retval = PTR_ERR(pid);
goto bad_fork_cleanup_io;
}
}

// ......

// 返回新进程 p
return p;
}

copy_process 主要分为三步:首先调用 dup_task_struct() 复制当前的进程描述符信息 task_struct,为新进程分配新的堆栈,第二步调用 sched_fork() 初始化进程数据结构,为其分配 CPU,把进程状态设置为 TASK_RUNNING,最后一步就是调用 copy_namespaces() 复制 namesapces。我们重点关注最后一步 copy_namespaces():

1
2
3
4
5
6
7
8
9
10
11
12
13
14
15
16
17
18
19
20
21
22
23
24
25
26
27
28
29
30
31
32
33
34
35
36
37
/*
* called from clone. This now handles copy for nsproxy and all
* namespaces therein.
*/
int copy_namespaces(unsigned long flags, struct task_struct *tsk)
{
struct nsproxy *old_ns = tsk->nsproxy;
struct user_namespace *user_ns = task_cred_xxx(tsk, user_ns);
struct nsproxy *new_ns;

if (likely(!(flags & (CLONE_NEWNS | CLONE_NEWUTS | CLONE_NEWIPC |
CLONE_NEWPID | CLONE_NEWNET)))) {
get_nsproxy(old_ns);
return 0;
}

if (!ns_capable(user_ns, CAP_SYS_ADMIN))
return -EPERM;

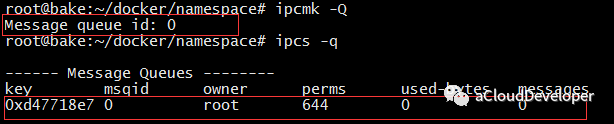
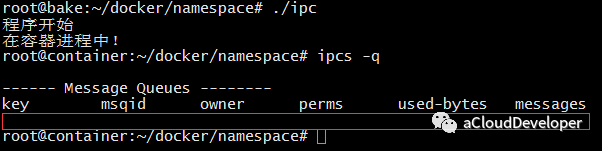
/*
* CLONE_NEWIPC must detach from the undolist: after switching
* to a new ipc namespace, the semaphore arrays from the old
* namespace are unreachable. In clone parlance, CLONE_SYSVSEM
* means share undolist with parent, so we must forbid using
* it along with CLONE_NEWIPC.
*/
if ((flags & (CLONE_NEWIPC | CLONE_SYSVSEM)) ==
(CLONE_NEWIPC | CLONE_SYSVSEM))
return -EINVAL;

new_ns = create_new_namespaces(flags, tsk, user_ns, tsk->fs);
if (IS_ERR(new_ns))
return PTR_ERR(new_ns);

tsk->nsproxy = new_ns;
return 0;
}

可见,copy_namespace() 主要基于“旧的” namespace 创建“新的” namespace,核心函数在于 create_new_namespaces:

1
2
3
4
5
6
7
8
9
10
11
12
13
14
15
16
17
18
19
20
21
22
23
24
25
26
27
28
29
30
31
32
33
34
35
36
37
38
39
40
41
42
43
44
45
46
47
48
49
50
51
52
53
54
55
56
57
58
59
60
61
62
63
64
65
66
67
/*
* Create new nsproxy and all of its the associated namespaces.
* Return the newly created nsproxy. Do not attach this to the task,
* leave it to the caller to do proper locking and attach it to task.
*/
static struct nsproxy *create_new_namespaces(unsigned long flags,
struct task_struct *tsk, struct user_namespace *user_ns,
struct fs_struct *new_fs)
{
struct nsproxy *new_nsp;
int err;

// 创建新的 nsproxy
new_nsp = create_nsproxy();
if (!new_nsp)
return ERR_PTR(-ENOMEM);

//创建 mnt namespace
new_nsp->mnt_ns = copy_mnt_ns(flags, tsk->nsproxy->mnt_ns, user_ns, new_fs);
if (IS_ERR(new_nsp->mnt_ns)) {
err = PTR_ERR(new_nsp->mnt_ns);
goto out_ns;
}
//创建 uts namespace
new_nsp->uts_ns = copy_utsname(flags, user_ns, tsk->nsproxy->uts_ns);
if (IS_ERR(new_nsp->uts_ns)) {
err = PTR_ERR(new_nsp->uts_ns);
goto out_uts;
}
//创建 ipc namespace
new_nsp->ipc_ns = copy_ipcs(flags, user_ns, tsk->nsproxy->ipc_ns);
if (IS_ERR(new_nsp->ipc_ns)) {
err = PTR_ERR(new_nsp->ipc_ns);
goto out_ipc;
}
//创建 pid namespace
new_nsp->pid_ns_for_children =
copy_pid_ns(flags, user_ns, tsk->nsproxy->pid_ns_for_children);
if (IS_ERR(new_nsp->pid_ns_for_children)) {
err = PTR_ERR(new_nsp->pid_ns_for_children);
goto out_pid;
}
//创建 network namespace
new_nsp->net_ns = copy_net_ns(flags, user_ns, tsk->nsproxy->net_ns);
if (IS_ERR(new_nsp->net_ns)) {
err = PTR_ERR(new_nsp->net_ns);
goto out_net;
}

return new_nsp;
// 出错处理
out_net:
if (new_nsp->pid_ns_for_children)
put_pid_ns(new_nsp->pid_ns_for_children);
out_pid:
if (new_nsp->ipc_ns)
put_ipc_ns(new_nsp->ipc_ns);
out_ipc:
if (new_nsp->uts_ns)
put_uts_ns(new_nsp->uts_ns);
out_uts:
if (new_nsp->mnt_ns)
put_mnt_ns(new_nsp->mnt_ns);
out_ns:
kmem_cache_free(nsproxy_cachep, new_nsp);
return ERR_PTR(err);
}

在create_new_namespaces()中,分别调用 create_nsproxy(), create_utsname(), create_ipcs(), create_pid_ns(), create_net_ns(), create_mnt_ns() 来创建 nsproxy 结构,uts,ipcs,pid,mnt,net。

具体的函数我们就不再分析,基本到此为止,我们从子进程创建,到子进程相关的信息的初始化,包括文件系统,CPU,内存管理等,再到各个 namespace 的创建,都走了一遍,下面附上 namespace 创建的代码流程图。

mnt namespace:

1
2
3
4
5
6
7
8
9
10
11
12
13
14
15
16
17
18
19
20
21
22
23
24
25
26
27
28
29
30
31
32
33
34
35
36
37
38
39
40
41
42
43
44
45
46
47
48
49
50
51
52
53
54
55
56
57
58
59
60
61
62
63
64
65
66
67
68
69
70
71
72
73
74
75
mnt namespace:
struct mnt_namespace *copy_mnt_ns(unsigned long flags, struct mnt_namespace *ns,
struct user_namespace *user_ns, struct fs_struct *new_fs)
{
struct mnt_namespace *new_ns;
struct vfsmount *rootmnt = NULL, *pwdmnt = NULL;
struct mount *p, *q;
struct mount *old;
struct mount *new;
int copy_flags;

BUG_ON(!ns);

if (likely(!(flags & CLONE_NEWNS))) {
get_mnt_ns(ns);
return ns;
}

old = ns->root;
// 分配新的 mnt namespace
new_ns = alloc_mnt_ns(user_ns);
if (IS_ERR(new_ns))
return new_ns;

namespace_lock();
/* First pass: copy the tree topology */
// 首先 copy root 路径
copy_flags = CL_COPY_UNBINDABLE | CL_EXPIRE;
if (user_ns != ns->user_ns)
copy_flags |= CL_SHARED_TO_SLAVE | CL_UNPRIVILEGED;
new = copy_tree(old, old->mnt.mnt_root, copy_flags);
if (IS_ERR(new)) {
namespace_unlock();
free_mnt_ns(new_ns);
return ERR_CAST(new);
}
new_ns->root = new;
list_add_tail(&new_ns->list, &new->mnt_list);

/*
* Second pass: switch the tsk->fs->* elements and mark new vfsmounts
* as belonging to new namespace. We have already acquired a private
* fs_struct, so tsk->fs->lock is not needed.
*/
// 为新进程设置 fs 信息
p = old;
q = new;
while (p) {
q->mnt_ns = new_ns;
if (new_fs) {
if (&p->mnt == new_fs->root.mnt) {
new_fs->root.mnt = mntget(&q->mnt);
rootmnt = &p->mnt;
}
if (&p->mnt == new_fs->pwd.mnt) {
new_fs->pwd.mnt = mntget(&q->mnt);
pwdmnt = &p->mnt;
}
}
p = next_mnt(p, old);
q = next_mnt(q, new);
if (!q)
break;
while (p->mnt.mnt_root != q->mnt.mnt_root)
p = next_mnt(p, old);
}
namespace_unlock();

if (rootmnt)
mntput(rootmnt);
if (pwdmnt)
mntput(pwdmnt);

return new_ns;
}

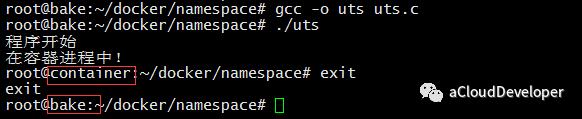
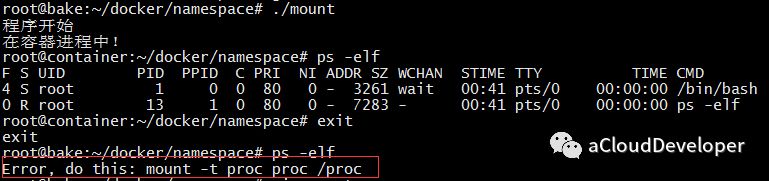
可以看到,mount namespace 在新建时会新建一个新的 namespace,然后将父进程的 namespace 拷贝过来,并将 mount->mnt_ns 指向新的 namespace。接着设置进程的 root 路径以及当前路径到新的 namespace,然后为新进程设置新的 vfs 等。从这里就可以看出,在子进程中进行 mount 操作不会影响到父进程中的 mount 信息。

uts namespace:

1
2
3
4
5
6
7
8
static inline struct uts_namespace *copy_utsname(unsigned long flags,
struct user_namespace *user_ns, struct uts_namespace *old_ns)
{
if (flags & CLONE_NEWUTS)
return ERR_PTR(-EINVAL);

return old_ns;
}

uts namespace 直接返回父进程 namespace 信息。

ipc namespace:

1
2
3
4
5
6
7
struct ipc_namespace *copy_ipcs(unsigned long flags,
struct user_namespace *user_ns, struct ipc_namespace *ns)
{
if (!(flags & CLONE_NEWIPC))
return get_ipc_ns(ns);
return create_ipc_ns(user_ns, ns);
}

ipc namespace 如果是设置了参数 CLONE_NEWIPC,则直接返回父进程的 namespace,否则返回新创建的 namespace。

pid namespace:

1
2
3
4
5
6
7
static inline struct pid_namespace *copy_pid_ns(unsigned long flags,
struct user_namespace *user_ns, struct pid_namespace *ns)
{
if (flags & CLONE_NEWPID)
ns = ERR_PTR(-EINVAL);
return ns;
}

pid namespace 直接返回父进程的 namespace。

net namespace

1
2
3
4
5
6
7
static inline struct net *copy_net_ns(unsigned long flags,
struct user_namespace *user_ns, struct net *old_net)
{
if (flags & CLONE_NEWNET)
return ERR_PTR(-EINVAL);
return old_net;
}

net namespace 也是直接返回父进程的 namespace。

OK,不知不觉写了这么多,但回头去看,这更像是代码走读,分析深度不够,更详细的大家可以参照源码,源码结构还是比较清晰的。

PS:文章未经我允许,不得转载,否则后果自负。

–END–

欢迎扫👇的二维码关注我的微信公众号,后台回复「m」,可以获取往期所有技术博文推送,更多资料回复下列关键字获取。

文章首发于我的公众号「Linux云计算网络」,欢迎关注,第一时间掌握技术干货!

Docker 是“新瓶装旧酒”的产物,依赖于 Linux 内核技术 chroot 、namespace 和 cgroup。本篇先来看 namespace 技术。

Docker 和虚拟机技术一样,从操作系统级上实现了资源的隔离,它本质上是宿主机上的进程(容器进程),所以资源隔离主要就是指进程资源的隔离。实现资源隔离的核心技术就是 Linux namespace。这技术和很多语言的命名空间的设计思想是一致的(如 C++ 的 namespace)。

隔离意味着可以抽象出多个轻量级的内核(容器进程),这些进程可以充分利用宿主机的资源,宿主机有的资源容器进程都可以享有,但彼此之间是隔离的,同样,不同容器进程之间使用资源也是隔离的,这样,彼此之间进行相同的操作,都不会互相干扰,安全性得到保障。

为了支持这些特性,Linux namespace 实现了 6 项资源隔离,基本上涵盖了一个小型操作系统的运行要素,包括主机名、用户权限、文件系统、网络、进程号、进程间通信。

这 6 项资源隔离分别对应 6 种系统调用,通过传入上表中的参数,调用 clone() 函数来完成。

1
int clone(int (*child_func)(void *), void *child_stack, int flags, void *arg);

clone() 函数相信大家都不陌生了,它是 fork() 函数更通用的实现方式,通过调用 clone(),并传入需要隔离资源对应的参数,就可以建立一个容器了(隔离什么我们自己控制)。

一个容器进程也可以再 clone() 出一个容器进程,这是容器的嵌套。

如果想要查看当前进程下有哪些 namespace 隔离,可以查看文件 /proc/[pid]/ns (注:该方法仅限于 3.8 版本以后的内核)。

可以看到,每一项 namespace 都附带一个编号,这是唯一标识 namespace 的,如果两个进程指向的 namespace 编号相同,则表示它们同在该 namespace 下。同时也注意到,多了一个 cgroup,这个 namespace 是 4.6 版本的内核才支持的。Docker 目前对它的支持普及度还不高。所以我们暂时先不考虑它。

下面通过简单的代码来实现 6 种 namespace 的隔离效果,让大家有个直观的印象。

UTS namespace


UTS namespace 提供了主机名和域名的隔离,这样每个容器就拥有独立的主机名和域名了,在网络上就可以被视为一个独立的节点,在容器中对 hostname 的命名不会对宿主机造成任何影响。

首先,先看总体的代码骨架:

1
2
3
4
5
6
7
8
9
10
11
12
13
14
15
16
17
18
19
20
21
22
23
24
25
26
27
28
29
30
31
#define _GNU_SOURCE
#include <sys/types.h>
#include <sys/wait.h>
#include <stdio.h>
#include <sched.h>
#include <signal.h>
#include <unistd.h>
#define STACK_SIZE (1024 * 1024)

static char container_stack[STACK_SIZE];
char* const container_args[] = {
"/bin/bash",
NULL
};

// 容器进程运行的程序主函数
int container_main(void *args)
{
printf("在容器进程中!\n");
execv(container_args[0], container_args); // 执行/bin/bash return 1;
}

int main(int args, char *argv[])
{
printf("程序开始\n");
// clone 容器进程
int container_pid = clone(container_main, container_stack + STACK_SIZE, SIGCHLD, NULL);
// 等待容器进程结束
waitpid(container_pid, NULL, 0);
return 0;
}

该程序骨架调用 clone() 函数实现了子进程的创建工作,并定义子进程的执行函数,clone() 第二个参数指定了子进程运行的栈空间大小,第三个参数即为创建不同 namespace 隔离的关键。

对于 UTS namespace,传入 CLONE_NEWUTS,如下:

1
int container_pid = clone(container_main, container_stack + STACK_SIZE, SIGCHLD | CLONE_NEWUTS, NULL);

为了能够看出容器内和容器外主机名的变化,我们子进程执行函数中加入:

1
sethostname("container", 9);

最终运行可以看到效果如下:

IPC namespace


IPC namespace 实现了进程间通信的隔离,包括常见的几种进程间通信机制,如信号量,消息队列和共享内存。我们知道,要完成 IPC,需要申请一个全局唯一的标识符,即 IPC 标识符,所以 IPC 资源隔离主要完成的就是隔离 IPC 标识符。

同样,代码修改仅需要加入参数 CLONE_NEWIPC 即可,如下:

1
int container_pid = clone(container_main, container_stack + STACK_SIZE, SIGCHLD | CLONE_NEWUTS | CLONE_NEWIPC, NULL);

为了看出变化,首先在宿主机上建立一个消息队列:

然后运行程序,进入容器查看 IPC,没有找到原先建立的 IPC 标识,达到了 IPC 隔离。

PID namespace


PID namespace 完成的是进程号的隔离,同样在 clone() 中加入 CLONE_NEWPID 参数,如:

1
int container_pid = clone(container_main, container_stack + STACK_SIZE, SIGCHLD | CLONE_NEWUTS | CLONE_NEWIPC | CLONE_NEWPID, NULL);

效果如下,echo $$ 输出 shell 的 PID 号,发生了变化。

但是对于 ps/top 之类命令却没有改变:

原因是 ps/top 之类的命令底层调用的是文件系统的 /proc 文件内容,由于 /proc 文件系统(procfs)还没有挂载到一个与原 /proc 不同的位置,自然在容器中显示的就是宿主机的进程。

我们可以通过在容器中重新挂载 /proc 即可实现隔离,如下:

这种方式会破坏 root namespace 中的文件系统,当退出容器时,如果 ps 会出现错误,只有再重新挂载一次 /proc 才能恢复。

一劳永逸地解决这个问题最好的方法就是用接下来介绍的 mount namespace。

mount namespace


mount namespace 通过隔离文件系统的挂载点来达到对文件系统的隔离。我们依然在代码中加入 CLONE_NEWNS 参数:

1
int container_pid = clone(container_main, container_stack + STACK_SIZE, SIGCHLD | CLONE_NEWUTS | CLONE_NEWIPC | CLONE_NEWPID | CLONE_NEWNS, NULL);

我验证的效果,当退出容器时,还是会有 mount 错误,这没道理,经多方查阅,没有找到问题的根源(有谁知道,可以留言指出)。

Network namespace


Network namespace 实现了网络资源的隔离,包括网络设备、IPv4 和 IPv6 协议栈,IP 路由表,防火墙,/proc/net 目录,/sys/class/net 目录,套接字等。

Network namespace 不同于其他 namespace 可以独立工作,要使得容器进程和宿主机或其他容器进程之间通信,需要某种“桥梁机制”来连接彼此(并没有真正的隔离),这是通过创建 veth pair (虚拟网络设备对,有两端,类似于管道,数据从一端传入能从另一端收到,反之亦然)来实现的。当建立 Network namespace 后,内核会首先建立一个 docker0 网桥,功能类似于 Bridge,用于建立各容器之间和宿主机之间的通信,具体就是分别将 veth pair 的两端分别绑定到 docker0 和新建的 namespace 中。

和其他 namespace 一样,Network namespace 的创建也是加入 CLONE_NEWNET 参数即可。我们可以简单验证下 IP 地址的情况,如下,IP 被隔离了。

User namespace


User namespace 主要隔离了安全相关的标识符和属性,包括用户 ID、用户组 ID、root 目录、key 以及特殊权限。简单说,就是一个普通用户的进程通过 clone() 之后在新的 user namespace 中可以拥有不同的用户和用户组,比如可能是超级用户。

同样,可以加入 CLONE_NEWUSER 参数来创建一个 User namespace。然后再子进程执行函数中加入 getuid() 和 getpid() 得到 namespace 内部的 User ID,效果如下:

可以看到,容器内部看到的 UID 和 GID 和外部不同了,默认显示为 65534。这是因为容器找不到其真正的 UID ,所以设置上了最大的UID(其设置定义在/proc/sys/kernel/overflowuid)。另外就是用户变为了 nobody,不再是 root,达到了隔离。

总结


以上就是对 6 种 namespace 从代码上简单直观地演示其实现,当然,真正的实现比这个要复杂得多,然后这 6 种 namespace 实际上也没有完全隔离 Linux 的资源,比如 SElinux、cgroup 以及 /sys 等目录下的资源没有隔离。目前,Docker 在很多方面已经做的很好,但相比虚拟机,仍然有许多安全性问题急需解决。

PS:文章未经我允许,不得转载,否则后果自负。

–END–

欢迎扫👇的二维码关注我的微信公众号,后台回复「m」,可以获取往期所有技术博文推送,更多资料回复下列关键字获取。